Whip and tongue graft
Download whip and tongue graft doc
The ‘whip and tongue’ graft is probably the most widely adopted method of bench grafting. Ideally choose rootstock and scion material of the same thickness as this maximises the chance of cambial contact all the way around. However, if your scion wood is thinner than your rootstock you can adjust the graft slightly to accommodate this.
The cambium layer, the slimy layer between the wood and bark, is where active growth occurs. Joining the cambium layers of the root and scion is crucial to the success of the graft. In whip and tongue grafting this is done when corresponding cuts through rootstock and scion material are joined end to end and then bound. The interlocking ‘tongues’ add structural support to the join as the cambium layers heal and fuse together, as well giving a larger surface area of cambial contact.
This graft is best done in late winter or early spring and it is extremely important that the scion wood is dormant, with no signs of growth. Dormant scions stored in an airtight container or bag in the fridge can be grafted later in the year onto actively growing rootstocks. This is useful for the stone fruits such as plums and cherries because they need more warmth to start the healing and bonding process. Whilst apple and pear “take” relatively easily, the stone fruits are more likely to take if the rootstock is already in the ground or a pot and putting on healthy growth. This makes the process of grafting more fiddly, but is worth doing for the increased success.
Some rootstocks have compatibility issues, in particular pears on Quince A or C. These will need an inter-stock, also known as a stem-builder, of a variety known to be compatible (Comice is frequently used).
Before starting, it is worth practicing on some spare pieces of wood to ‘get your hand in’ and increase your confidence. Hawthorn makes good practice wood if you are short of scion material.
Be careful not to touch the cut surface of either your scion or rootstock, as oils from your skin can interfere with the healing of the graft.
You will need
- Rootstock
- Scion wood of your chosen variety – see scion selection guide
- Grafting knife or similar sharp knife
- Grafting tape – florist tape or strips of freezer bag will do if you can’t get hold of grafting tape
- Grafting wax – candle wax mixed with a little petroleum jelly to reduce melting point works
- Tree label
- Waterproof marker pen
The graft
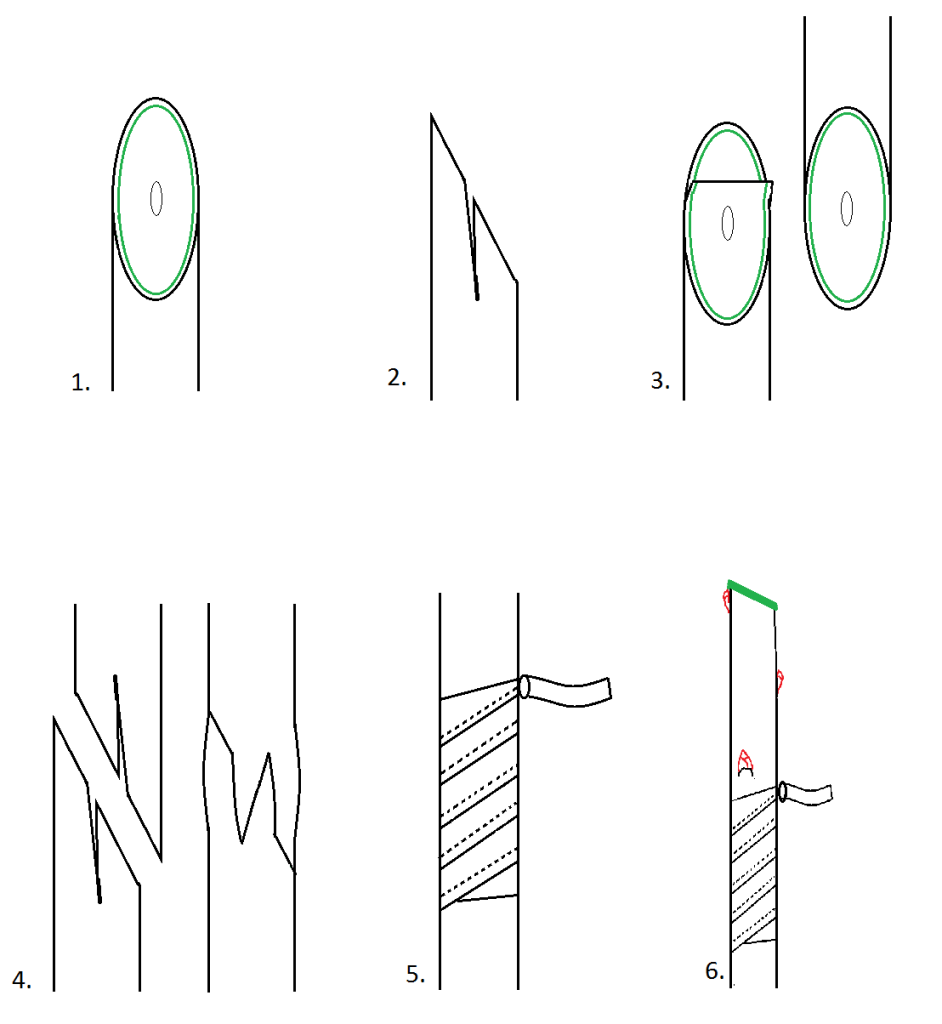
- Make a slanting cut through the scion wood with a sharp grafting knife. Aim to create a flat oval cut face between about one and two inches long. This cut should ideally be done in one go, as this slice needs to be smooth and flat. Longer cuts will give better support, but are more difficult to get completely flat, as well as to bind tight along the length of it.
The best way to make this cut is by holding the knife in your dominant hand, the wood in the other, and cut with a pulling motion parallel across your chest and away from the hand holding the wood. Try to make this cut with a single slicing motion using the length of your blade. Using a straight edge, like the back of your grafting knife, you can assess whether your cut is roughly straight, if not then try doing again. It is worth getting this bit right. - Make another cut downwards into the scion wood, about one third of the way from the top of the cut face, about half an inch deep. This is a dangerous and difficult cut, as you are often cutting towards your hand that is holding the work. To minimise the risk of damage, place the outside edge your cutting-hand thumb over the end of the thumb of the hand holding the material to ‘lock’ them in a figure ‘T’. This will give you more control and reduce the chance of the knife slipping. This creates one of the ‘tongues’ that will interlock and hold the join fast.
- Make a corresponding slanting cut in your rootstock. Match up these cut surfaces, to check that they are the right length, and that if held together the cambium layers meet. Make any adjustments to your cuts if necessary. A small gap is acceptable as the binding will pull the two pieces together.
- Make a matching tongue cut of equal depth in the scion wood. Line the cuts up, and slide them together, making sure to interlock the tongues. Check again that the cambium layer of each is in contact with the other. This is crucial to the success of the graft.
- Wrap the graft tightly with grafting tape or something similar. This helps keep the cut sides pressed firmly together, and also reduces the loss of moisture from the cuts. Tie off with a half hitch knot unless you are using self-adhesive grafting tape. Alternatively you can tie your graft together with strips of freezer bag, florist tape, string or even elastic bands, but for the latter two make sure to cover the grafted area with grafting wax afterwards to make it watertight.
- Cut the scion wood at a slanting angle away from the third good bud above the graft. Cover this cut surface with grafting wax to seal it. Make sure the wax isn’t too hot otherwise you can damage the top bud, just melted will do.
- Label immediately with the variety, the rootstock, and the date of grafting. It is all too easy to forget what you have by the summer.
- Dig your tree in to a pot of soil or a bed in a sheltered position out of the sun while the graft heal.
Aftercare
- The graft needs to heal before your new tree will start to grow. This can take anywhere from a couple of weeks to a couple of months, depending on the conditions. Once the top bud has grown an inch or so you can be happy your graft has taken and you can move the plant into a sunnier location.
- Once it is clear that the graft has successfully taken cut off all but the strongest shoot, usually the top one, as well as any growth below the graft. Remove any other shoots for the first few years of growth.
- Carefully remove the tape around mid-summer. If it has taken the graft should be healed and the young tree growing. If you wait too long to remove the tape, you can strangle and kill the graft.
- Grafts that have taken and grown over the summer can be planted over the winter, or grown on for another year first. If you plant them out the winter after grafting, make sure to clear the area of plants as these will compete for water and may grow to out-shade your young tree or create a microhabitat that is too humid. If you grow them on for another year before planting out, pot up after the first year to refresh the soil and give the roots space to develop outward rather than forming a tight ball or winding around the container base.
Modified whip and tongue graft
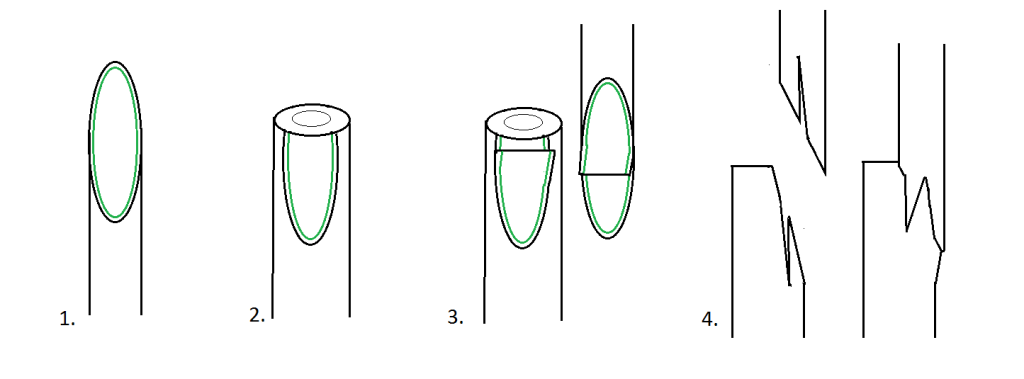
It is best to do your whip and tongue graft using scion wood that is the same diameter as your rootstock, however this is not always possible as sometimes you have larger rootstocks than scions. This is absolutely fine as you can modify the cuts of your whip and tongue graft to accommodate the difference.
Start by cutting the wood of the smaller diameter as in step 1. Normally this will be the scion wood. Use this as a template for the size and shape of the cut to your larger piece. Cut away only the side rather than going all the way through so that the cut surface is the same size as the first piece. Make sure that you cut deep enough to reach the cambium layer because as with any graft, it is the contact between the cambium layers that heals and creates the union. Once you are happy that the two cut surfaces match in size and shape, carefully put the tongue cuts in, interlock these tongue cuts and bind as you would with a standard whip and tongue graft.
Download
Download a Word version of this whip and tongue graft guide