Pruning: an intro to techniques
Making small cuts: the basics
Where to make the cuts
Always prune to just above a bud. This bud will then be the growing point and any material above it will die back. However do not prune so close that you risk damaging the bud. If you do damage the top bud through pruning, cut back to the next appropriate one. After pruning, the new top bud will gain apical dominance, meaning that is where the majority of next season’s growth will be. Buds below this may put on limited growth or remain dormant.
How to make the cuts
All cuts should be clean, made with sharp tools so that there is no bruising or ragged edges which can increase the chances of infection.
Cuts should be made at a slight angle slanting away from the bud. This channels water to run off away from the bud and so reduces the risk of rot.
Cut above which bud?
When you cut a stem, the next healthy bud below the cut will become activated and start to grow. The direction that this bud faces will be the direction of new growth, which is why the advice is always to prune to an outward facing bud to achieve an outward growing branch. Horizontal growth directed away from the tree centre is what you should aim for.
Fruit trees produce buds up the stem in whorls, meaning you can choose the direction of the new growth, by cutting to whichever bud faces in the appropriate direction. This can be really useful when re-shaping an old tree.
Cutting away disease
Excessively diseased growth should be cut away, making sure you cut into healthy wood or the disease will continue to spread.
Note that this is the opposite if you are having to cut away dead wood, where the cut should be made in the dead wood so as not to make any unnecessary cuts in healthy material which can be an access point for disease. Unless the dead wood is threatening the longevity of your tree, we recommend you retain it in the tree as this provides a special dry deadwood habitat. The decay process and faunal composition is entirely different from that of deadwood on the ground.
Making large cuts: the basics
Deciding which branch to remove
Select large branches for removal carefully as a mistake takes years to correct. The guidelines on winter pruning and restorative pruning should advise you on the considerations and so help you make your decision on which branch should be removed.
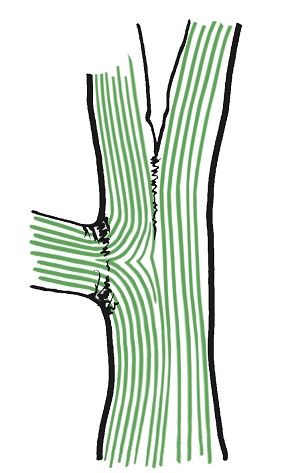 Branches that have a narrow angle from the main trunk are more likely to be shed than branches with a wide angle. This is because they only form partial ‘collars’ – the wrinkly bark at the branch junction – and the collar that does form becomes included in the branch union (or crotch). These can become problematic as the weight of the branch and fruit increases. If a branch snaps, aside from the obvious safety concerns, it can tear bark from the trunk and may break other limbs as it falls. For this reason, branches with an acute angle to the trunk should be removed in preference to limbs with a wider angle.
The branch collar at the insertion point of wide angled limbs is complete and embeds new wood in the trunk as it grows providing good mechanical strength. In the formative stages of shaping a tree, branches can be encouraged to grow at a wide angle from the trunk by tying or weighting the branches down as they grow.
How to make large pruning cuts
Try not to make random cuts in large branches. Either take the whole branch out, making sure not to damage the branch collar, or cut it just before a side branch. If you do the latter then the vigour will be directed into this side branch in the following growing season which should generate new or stronger growth. If when reducing bough length there is no appropriate renewal branch, there will probably be lots of bushy growth at the cut end which will need summer pruning to select the strongest and best-placed replacement.
When cutting out the whole branch, begin by finding the branch bark ridge which is a raised ridge of bark where the branch meets the trunk. Make the cut just outside of this, angling your cut outwards so that it is slightly wider at the bottom than at the top. Make sure you keep the branch collar intact so that the cut will callous over more readily and seal the wound. Never cut off large branches flush to the trunk.
When taking out large branches in this way, there is a danger that the weight of the branch will break it off before it has been completely cut through. This could tear a strip of bark from the trunk as it comes down, causing a large wound in your tree. To avoid this, it is best to take out heavier branches in three staged cuts.
- Cut 1. Cut upwards no more than a third of the thickness, a hand or twos width from the trunk. Don’t go too deep or the saw can get trapped. If this happens, lift the branch to release it rather than forcing it out.
- Cut 2. Cut all the way through the branch from above a little further along the branch from the first cut. This takes the weight off of the branch before you make the final cut, with cut 1 preventing the bark from tearing down the trunk.
- Cut 3. The final cut removes the stub, removing all the material to the branch bark ridge and collar. Make this cut downwards, close to the bark ridge (not the trunk). This usually involves cutting down and slightly outwards. Without the weight of the whole branch to contend with, there should be minimal risk of tearing and damage to the collar or main trunk.