How to build a bat box

Bats make up nearly a fifth of our mammal species. But despite this, bats have significantly declined in the UK as their habitat, roosts and food supplies are disturbed or destroyed by building and development. That’s why we’re funding research into how we can best protect them, and you can help them too.
A bat box is an artificial roost which is hugely beneficial to bats, offering them a safe place to live when suitable roosting sites are limited. With a few household items, you can build your own bat box to help protect this vulnerable species. When deciding where to place your box, you should consider areas at least 4m above the ground, where bats might already be known to feed and fly (close to hedges and tree lines), with minimal artificial light, shelter from strong winds, and exposure to the sun for part of the day.
Bats may not use your box immediately, so please be patient!
You will need
- Untreated, rough cut wood
- Tape measure
- Pencil
- Saw, hammer, drill
- Nails or wood glue
- Ladder
- Screws or adjustable ties
Build your bat box
- Choose where you want to place your box. This could be on the trunk of a nearby tree or under the eaves of your house. Ensure you place it at least 3 metres from the ground, away from artificial light and in a position that bats can easily fly into.
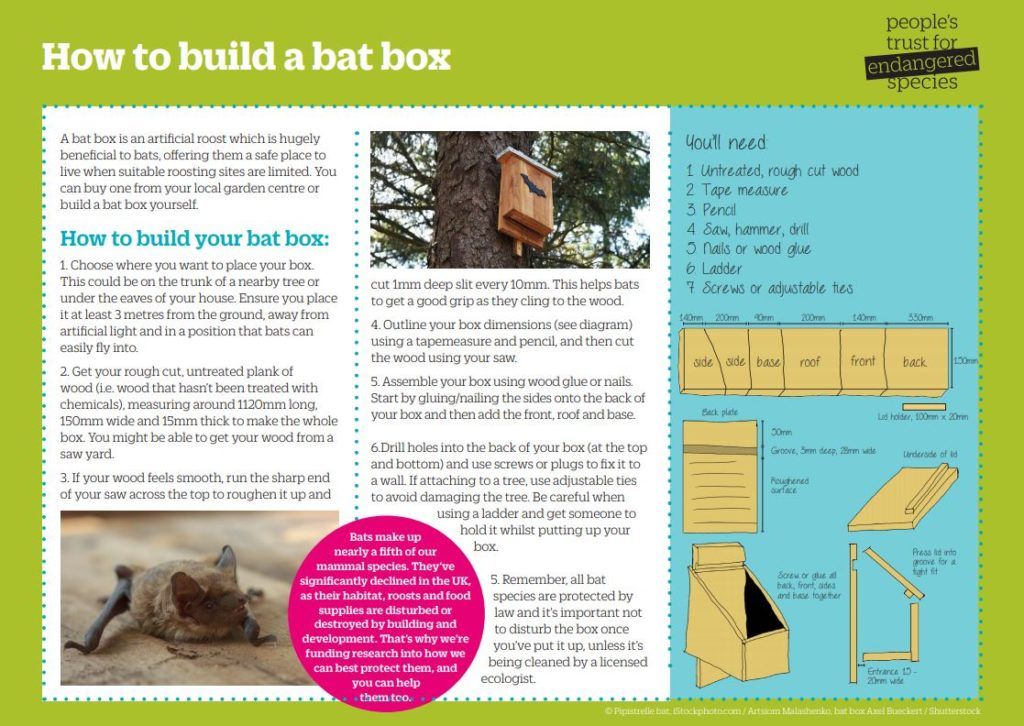
- Get your rough cut, untreated plank of wood (i.e. wood that hasn’t been treated with chemicals), measuring around 1120mm long, 150mm wide and 15mm thick to make the whole box. You might be able to get your wood from a saw yard.
- If your wood feels smooth, run the sharp end of your saw across the top to roughen it up and cut 1mm deep slit every 10mm. This helps bats to get a good grip as they cling to the wood.
- Outline your box dimensions (see diagram) using a tapemeasure and pencil, and then cut the wood using your saw.
- Assemble your box using wood glue or nails. Start by gluing/nailing the sides onto the back of your box and then add the front, roof and base.
- Drill holes into the back of your box (at the top and bottom) and use screws or plugs to fix it to a wall. If attaching to a tree, use adjustable ties to avoid damaging the tree. If affixing to a house, they should be placed as close to the eaves as possible. Be careful when using a ladder and get someone to hold it whilst putting up your box.
- Remember, all bat species are protected by law and it’s important not to disturb the box once you’ve put it up, unless it’s being cleaned by a licensed ecologist.
Click image to download instructions:
Show us your creation!
Take a photo of your bat box and submit it below, or post on social media and inspire others to do the same!